How to Install and Configure CSF (Config Server Firewall) on CentOS 7
Config Server Firewall / CSF is firewall application suite for Linux servers. CSF is also a Login/Intrusion Detection for applications like SSH, SMTP, IMAP, Pop3, the "su" command and many more. CSF can e.g. detect when someone is logging into the server via SSH and alarms you when this user tries to use the "su" command on the server to get higher privileges. It also checks for login authentication failures on mail servers (Exim, IMAP, Dovecot, uw-imap, Kerio), OpenSSH servers, Ftp servers (Pure-ftpd, vsftpd, Proftpd), cPanel server to replace software like fail2ban. CSF is a good security solution for hosting servers and can be integrated into the user interface (UI) of WHM/cPanel, DirectAdmin, and Webmin.
Prerequisites
- CentOS 7 (server example IP 192.168.1.101).
- root privileges.
What we will do in this tutorial:
- Install the dependencies for CSF.
- Install CSF.
- Configure CSF.
- Basic CSF commands.
- Advanced Configuration.
Step 1 - Installation of CFS dependencies
CSF is based on Perl, so you need to install Perl on our server first. You need wget to download the CSF installer and vim (or an editor of your choice) for editing the CSF configuration file. Install the packages with the yum command:
yum install wget vim perl-libwww-perl.noarch perl-Time-HiRes
Step 2 - Install CSF
Please go to the "/usr/src/" directory and download CSF with wget command.
cd /usr/src/
wget https://download.configserver.com/csf.tgz
Extract the tar.gz file and go to csf directory, then install it:
tar -xzf csf.tgz
cd csf
sh install .sh
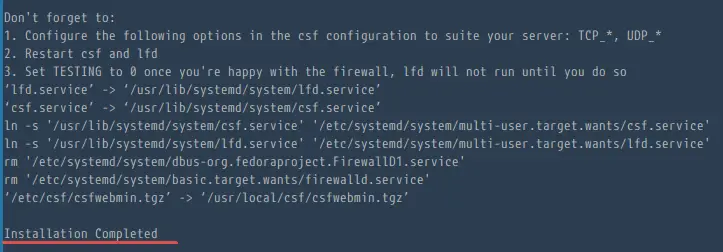
You should get the information that CSF installation is completed at the end.
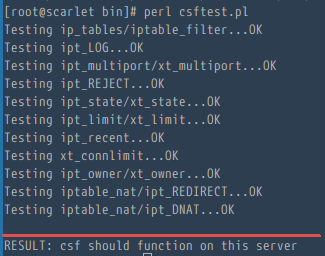
Now you should check that CSG really works on this server. Go to the "/usr/local/csf/bin/" directory, and run "csftest.pl".
cd /usr/local/csf/bin/
perl csftest.pl
If you see the test results as shown below, then CSF is running without problems on your server:
RESULT: csf should function on this server
Step 3 - Configure CSF on CentOS 7
Before stepping into the CSF configuration process, the first thing you must know is that "CentOS 7" has a default firewall application called"firewalld". You have to stop firewalld and remove it from the startup.
Stop the firewalld:
systemctl stop firewalld
Disable/Remove firewalld from the startup:
systemctl disable firewalld
Then go to the CSF Configuration directory "/etc/csf/" and edit the file "csf.conf" with the vim editor:
cd /etc/csf/
vim csf.conf
Change line 11 "TESTING " to "0" for applying the firewall configuration.
TESTING = "0"
By default CSF allows incoming and outgoing traffic for the SSH standard port 22, if you use a different SSH port then please add your port to the configuration in line 139 "TCP_IN".
Now start CSF and LFD with systemctl command:
systemctl start csf
systemctl start lfd
And then enable the csf and lfd services to be started at boot time:
systemctl enable csf
systemctl enable lfd
Now you can see the list default rules of CSF with command:
csf -l
Step 4 - Basic CSF Commands
1. Start the firewall (enable the firewall rules):
csf -s
2. Flush/Stop the firewall rules.
csf -f
3. Reload the firewall rules.
csf -f
4. Allow an IP and add it to csf.allow.
csf -a 192.168.1.109
Results:
Adding 192.168.1.109 to csf.allow and iptables ACCEPT...
ACCEPT all opt -- in !lo out * 192.168.1.109 -> 0.0.0.0/0
ACCEPT all opt -- in * out !lo 0.0.0.0/0 -> 192.168.1.109
5. Remove and delete an IP from csf.allow.
csf -ar 192.168.1.109
Results:
Removing rule...
ACCEPT all opt -- in !lo out * 192.168.1.109 -> 0.0.0.0/0
ACCEPT all opt -- in * out !lo 0.0.0.0/0 -> 192.168.1.109
6. Deny an IP and add to csf.deny:
csf -d 192.168.1.109
Results:
Adding 192.168.1.109 to csf.deny and iptables DROP...
DROP all opt -- in !lo out * 192.168.1.109 -> 0.0.0.0/0
LOGDROPOUT all opt -- in * out !lo 0.0.0.0/0 -> 192.168.1.109
7. Remove and delete an IP from csf.deny.
csf -dr 192.168.1.109
Results:
Removing rule...
DROP all opt -- in !lo out * 192.168.1.109 -> 0.0.0.0/0
LOGDROPOUT all opt -- in * out !lo 0.0.0.0/0 -> 192.168.1.109
8. Remove and Unblock all entries from csf.deny.
csf -df
Results:
DROP all opt -- in !lo out * 192.168.1.110 -> 0.0.0.0/0
LOGDROPOUT all opt -- in * out !lo 0.0.0.0/0 -> 192.168.1.110
DROP all opt -- in !lo out * 192.168.1.111 -> 0.0.0.0/0
LOGDROPOUT all opt -- in * out !lo 0.0.0.0/0 -> 192.168.1.111
csf: all entries removed from csf.deny
9. Search for a pattern match on iptables e.g : IP, CIDR, Port Number
csf -g 192.168.1.110
Step 5 - Advanced Configuration
Here are some tweaks about CSF, so you can configure as you need.
Back to the csf configuration directory, and edit the csf.conf configuration file:
cd /etc/csf/
vim csf.conf
1. Don't Block IP addresses that are in the csf.allow files.
By default lfd also will block an IP under csf.allow files, so if you want that an IP in csf.allow files never get blocked by lfd, then please go to the line 272and change "IGNORE_ALLOW" to "1". This is useful wehn you have a static IP at home or in office and want to ensure that your IP never gets blocked by the firewall on your internet server.
IGNORE_ALLOW = "1"
2. Allow Incoming and Outgoing ICMP.
Go to the line 152 for incoming ping/ICMP:
ICMP_IN = "1"
And line 159 for outgoing ping ping/ICMP:
ICMP_OUT = "1"
3. Block Certain Countrys
CSF provide an option to allow and deny access by country using the CIDR (Country Code). Go to line 836 and add the country codes that shall be allowed and denied:
CC_DENY = "CN,UK,US"
CC_ALLOW = "ID,MY,DE"
4. Send the Su and SSH Login log by Email.
You can set an email address that is used by LFD to send an email about "SSH Login" events and users that run the "su" command, go to the line1069 and change the value to "1".
LF_SSH_EMAIL_ALERT = "1"
...
LF_SU_EMAIL_ALERT = "1"
And then define the email address you want to use in line 588.
LF_ALERT_TO = "mymail@mydomain.tld"
If you want more tweaks, read the options in the "/etc/csf/csf.conf" configuration file.
